|
What are the various screen parts of TRASER 2.0?

Back to top
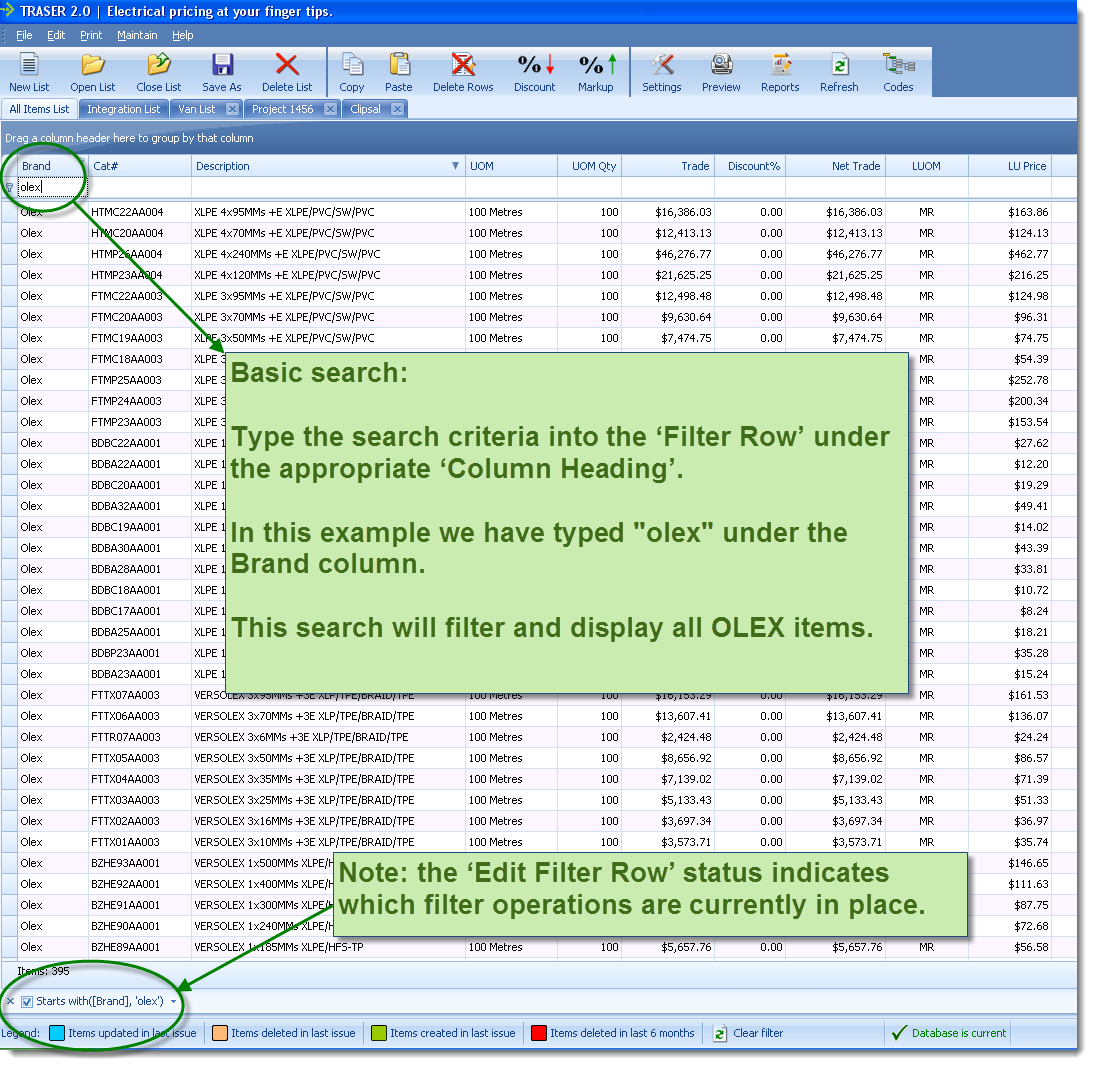
How do I perform a basic search for items?
Back to top
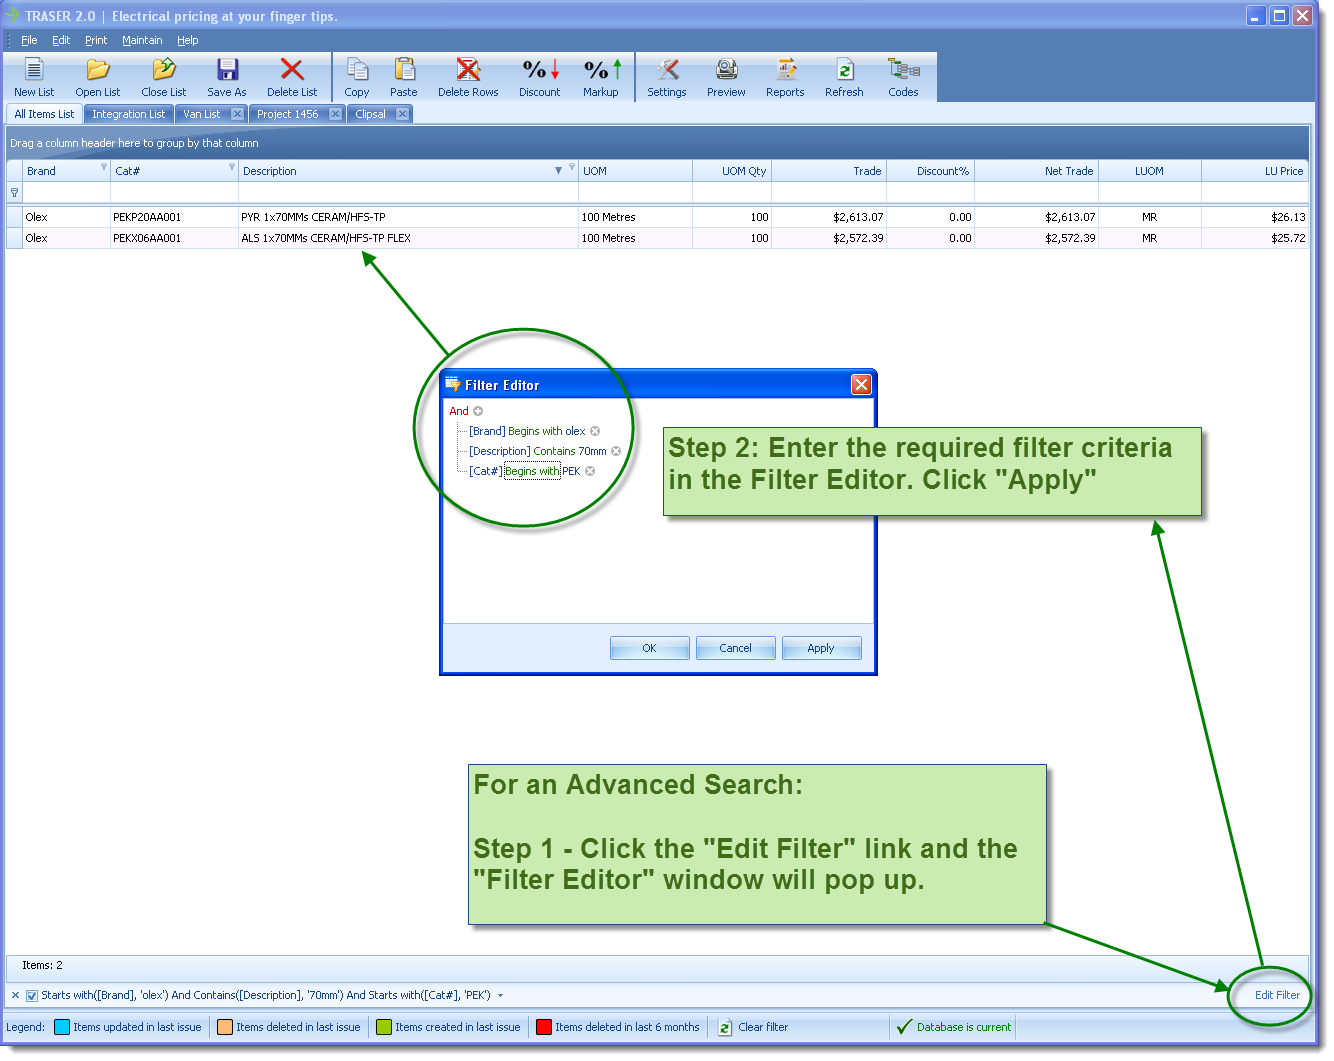
How do I perform an advanced search for items?
Back to top
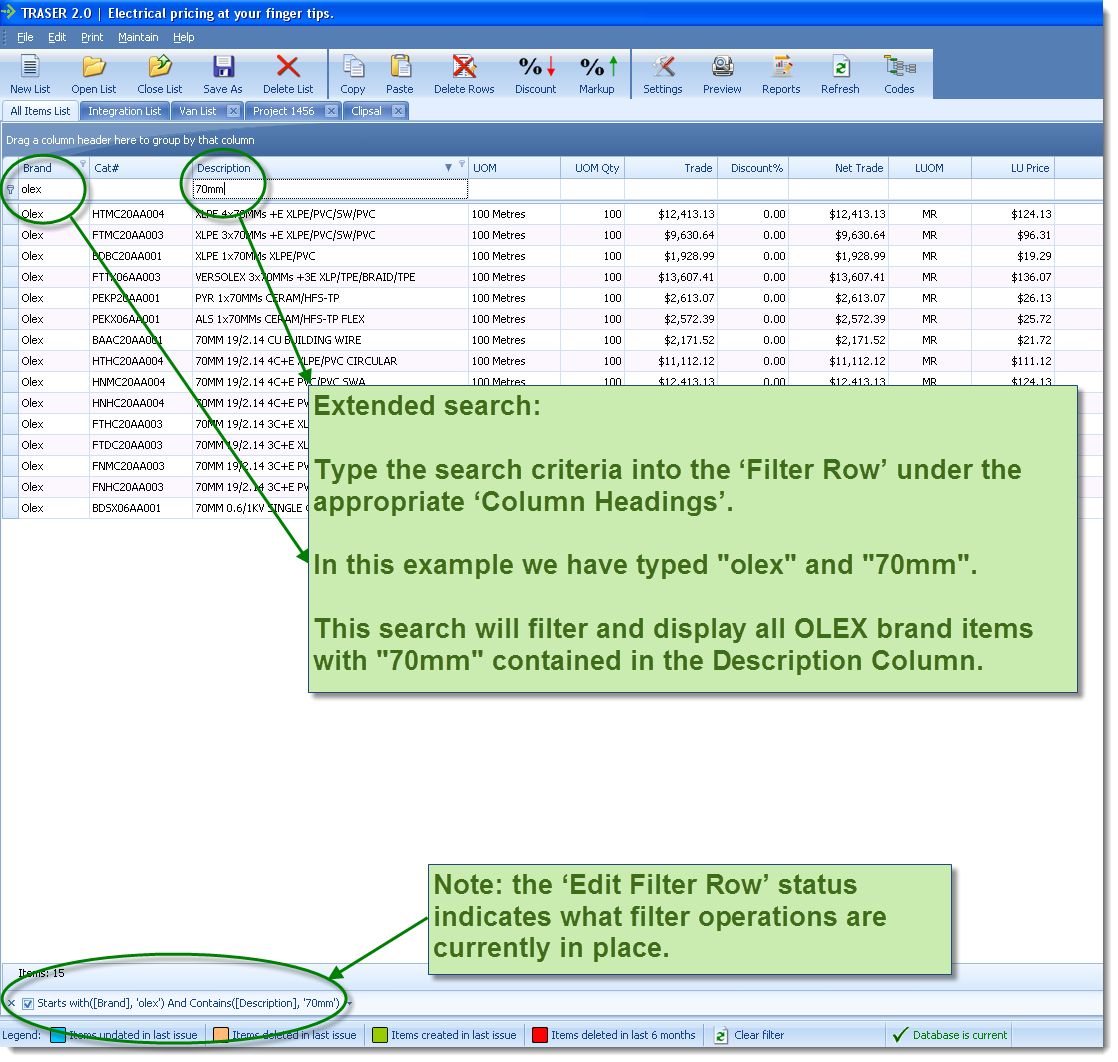
How do I perform an extended search for items?
Back to top
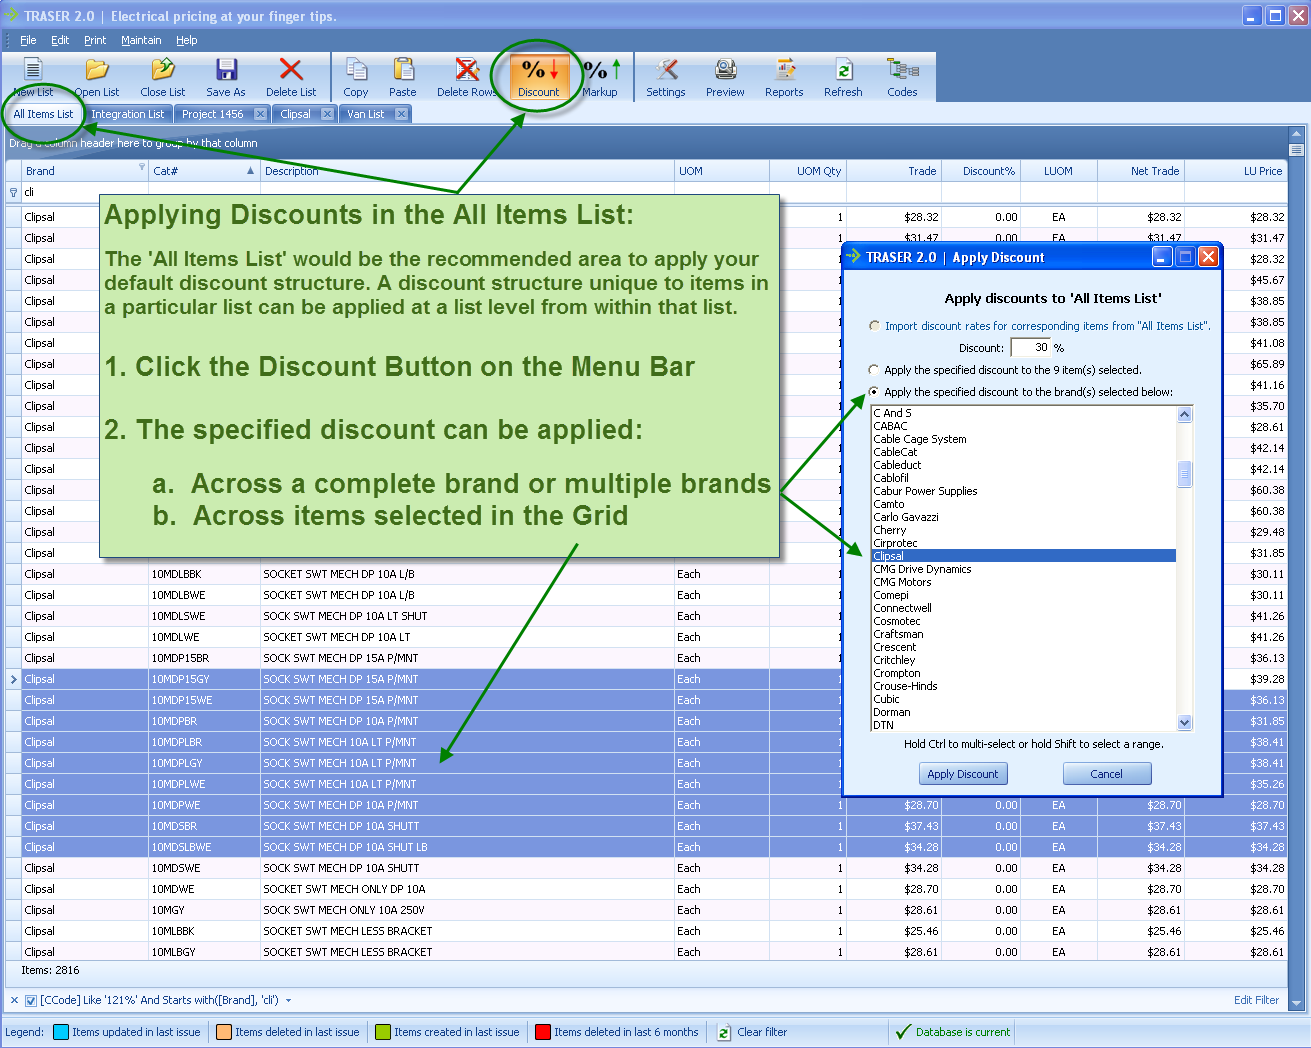
How do I apply my discount rates on items in 'All Items List'?
Back to top
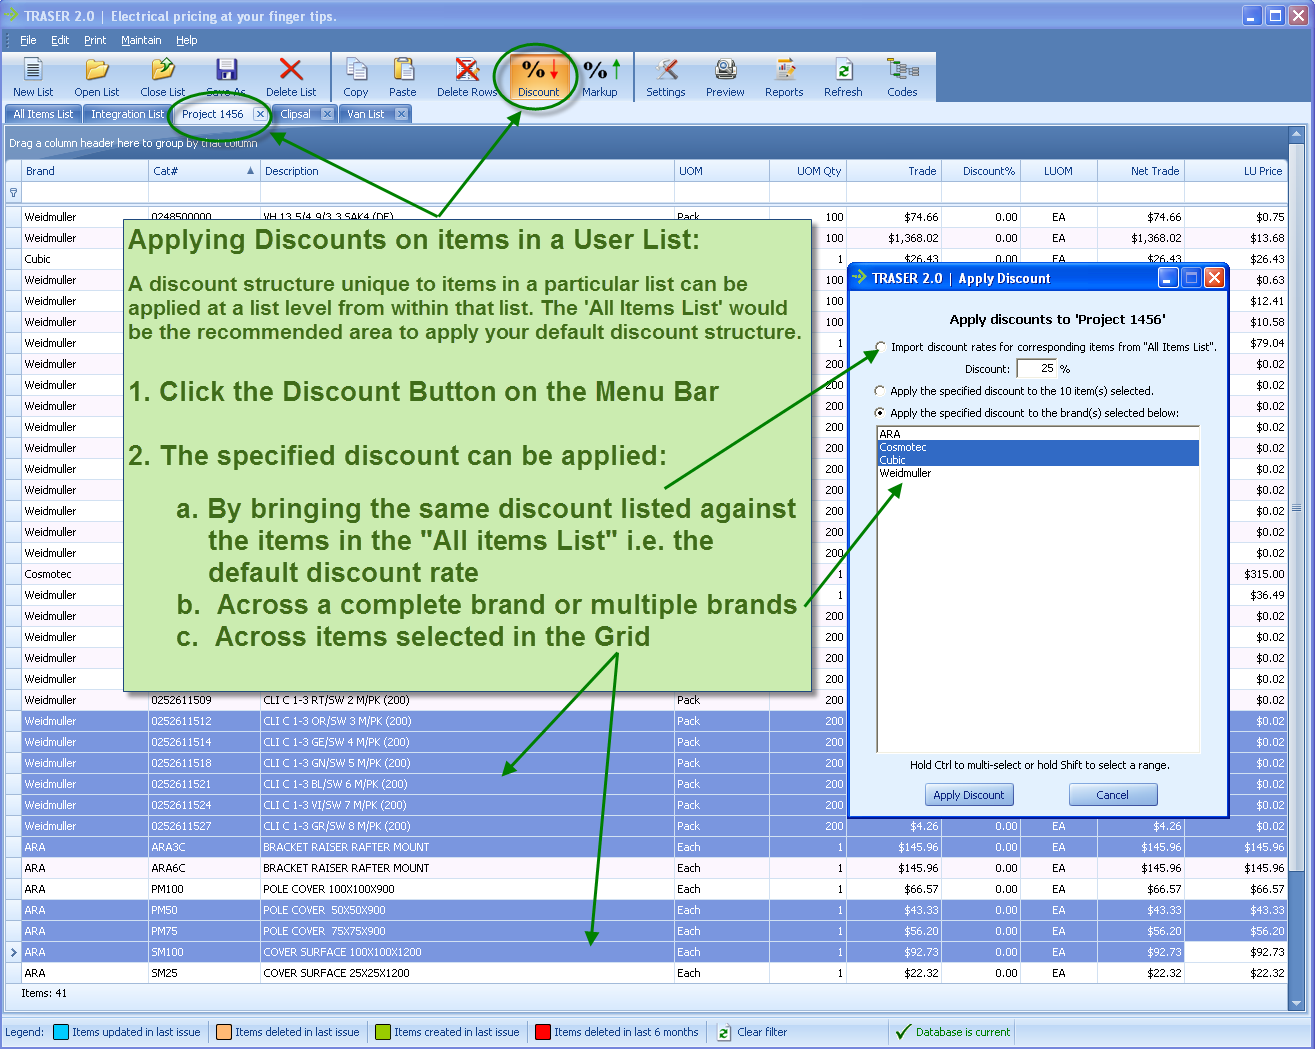
How do I apply my discount rates on items in my other lists?
Back to top
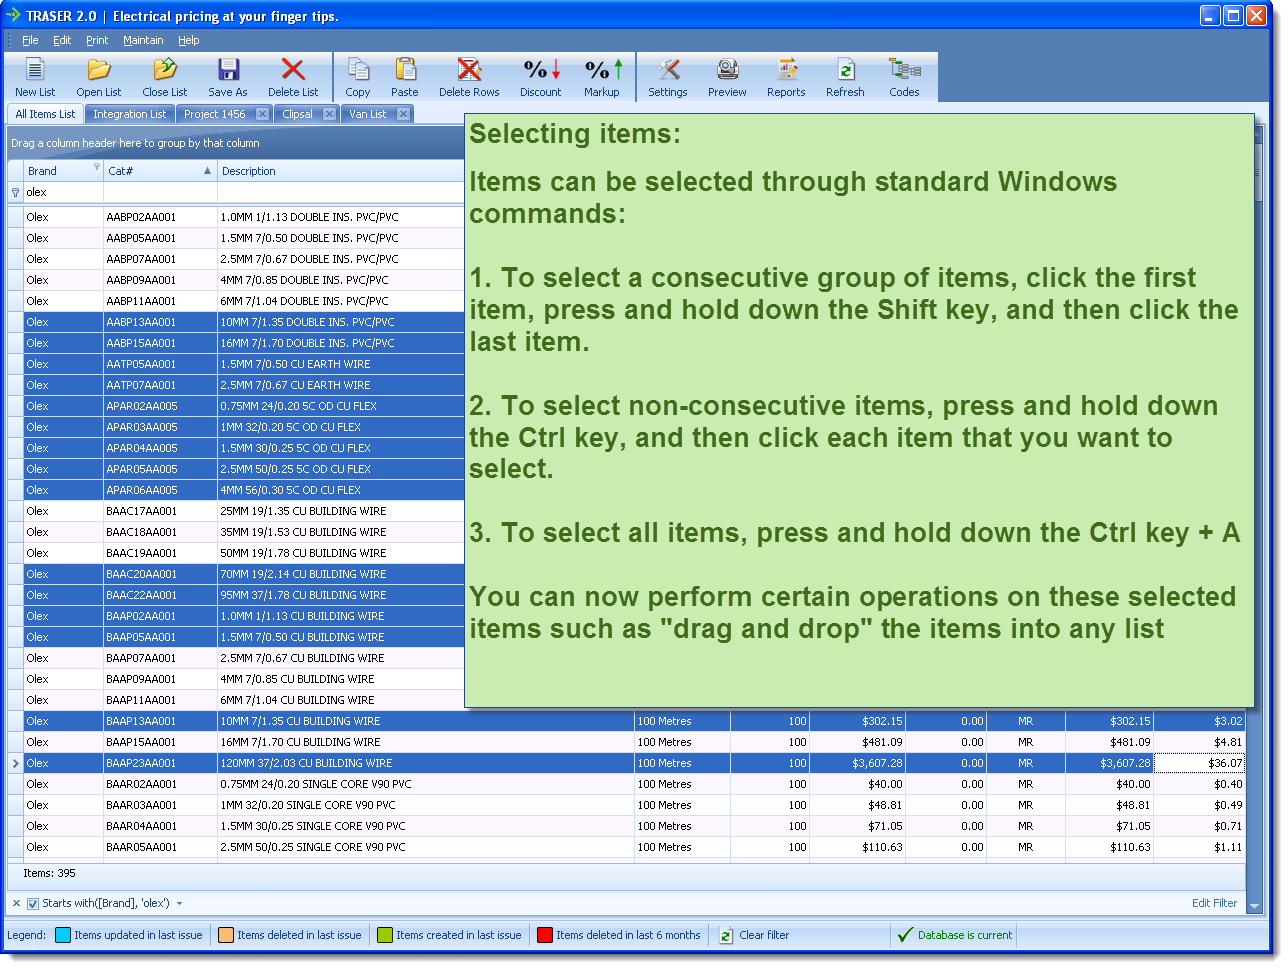
How do I select multiple items?
Back to top
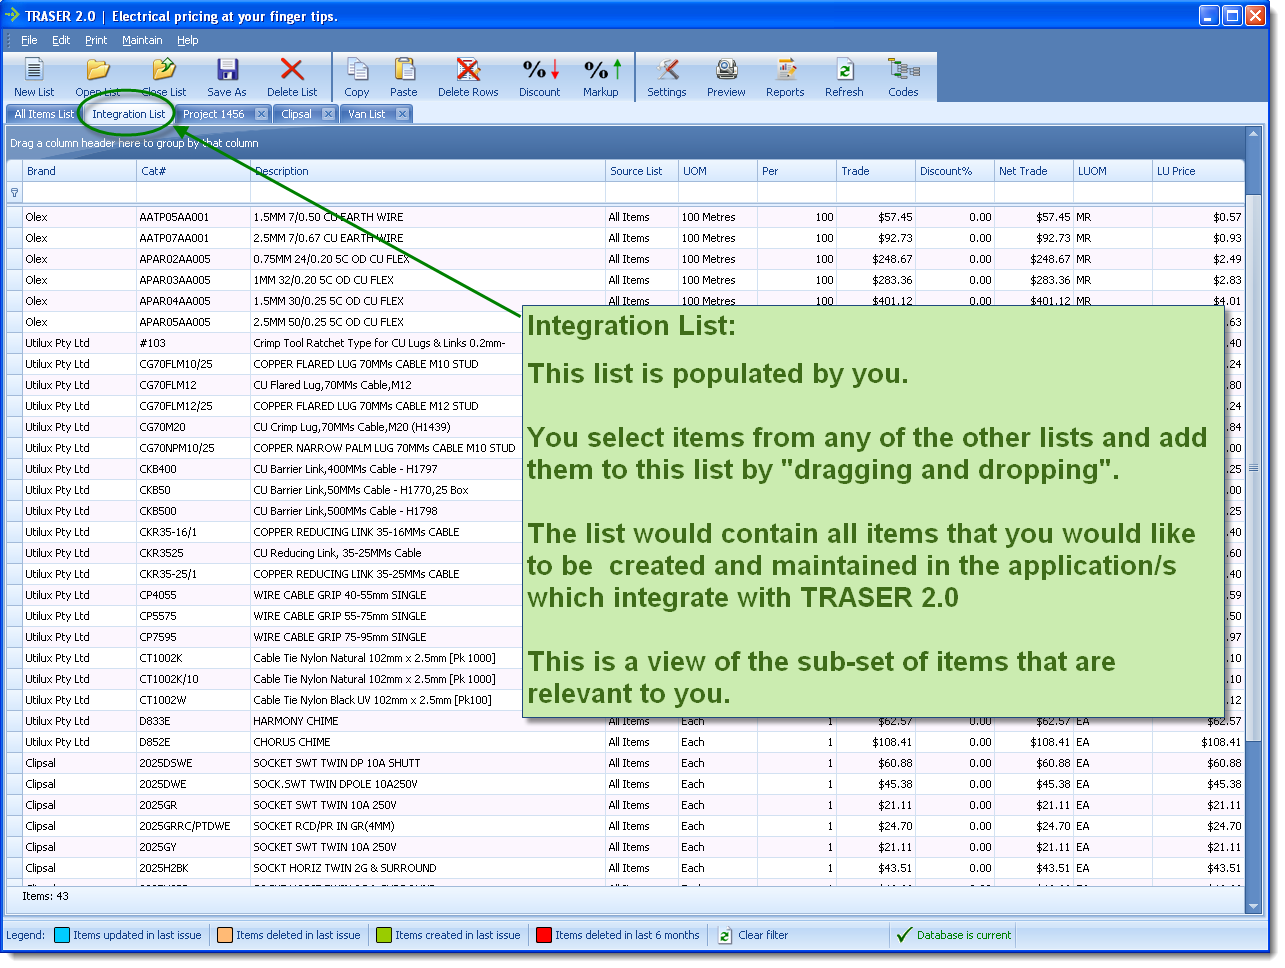
What is 'Integration List' and why do I need it?
Back to top
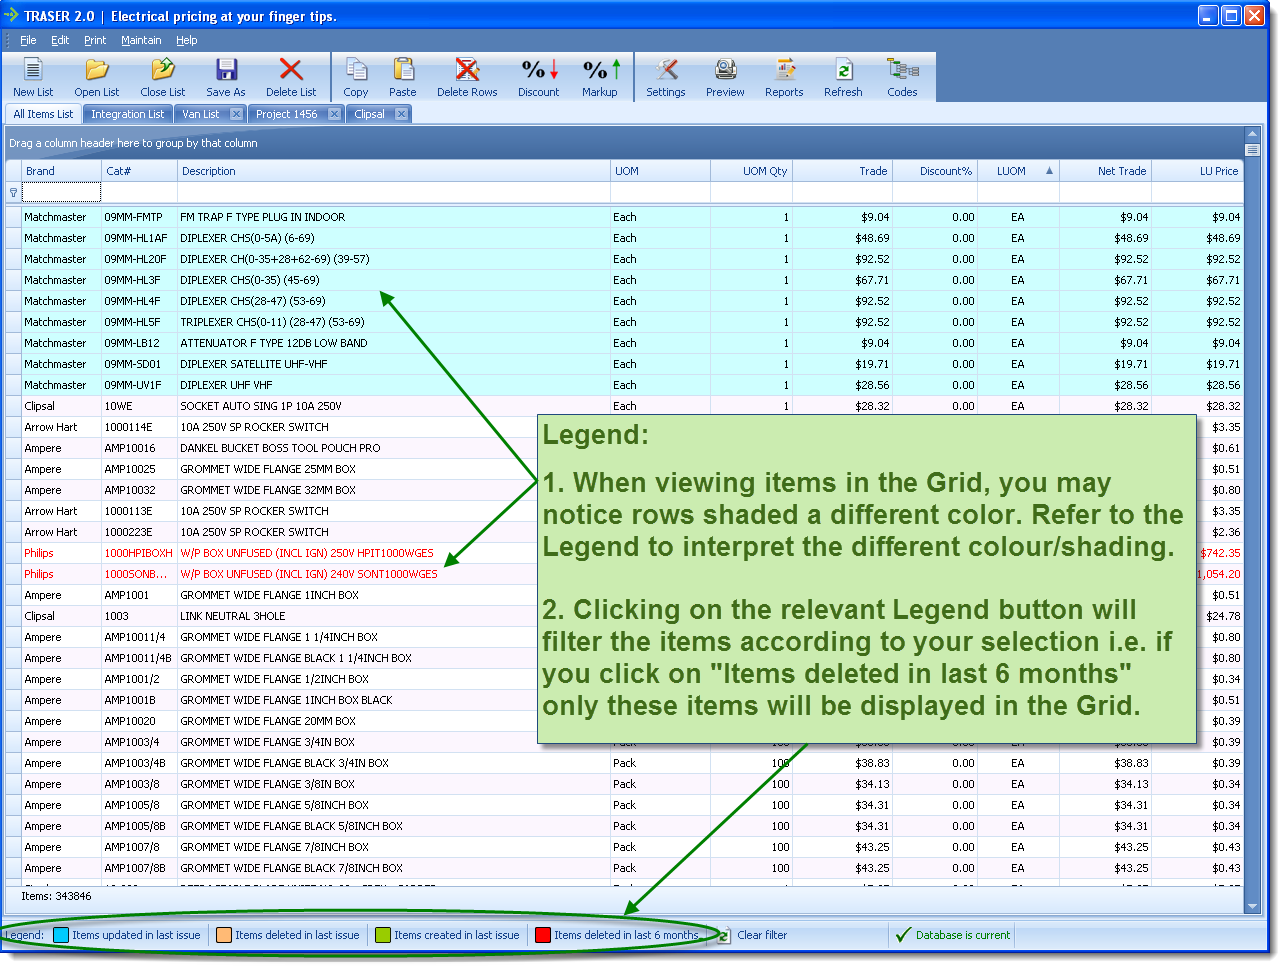
What are the color-coded legends at the bottom?
Back to top
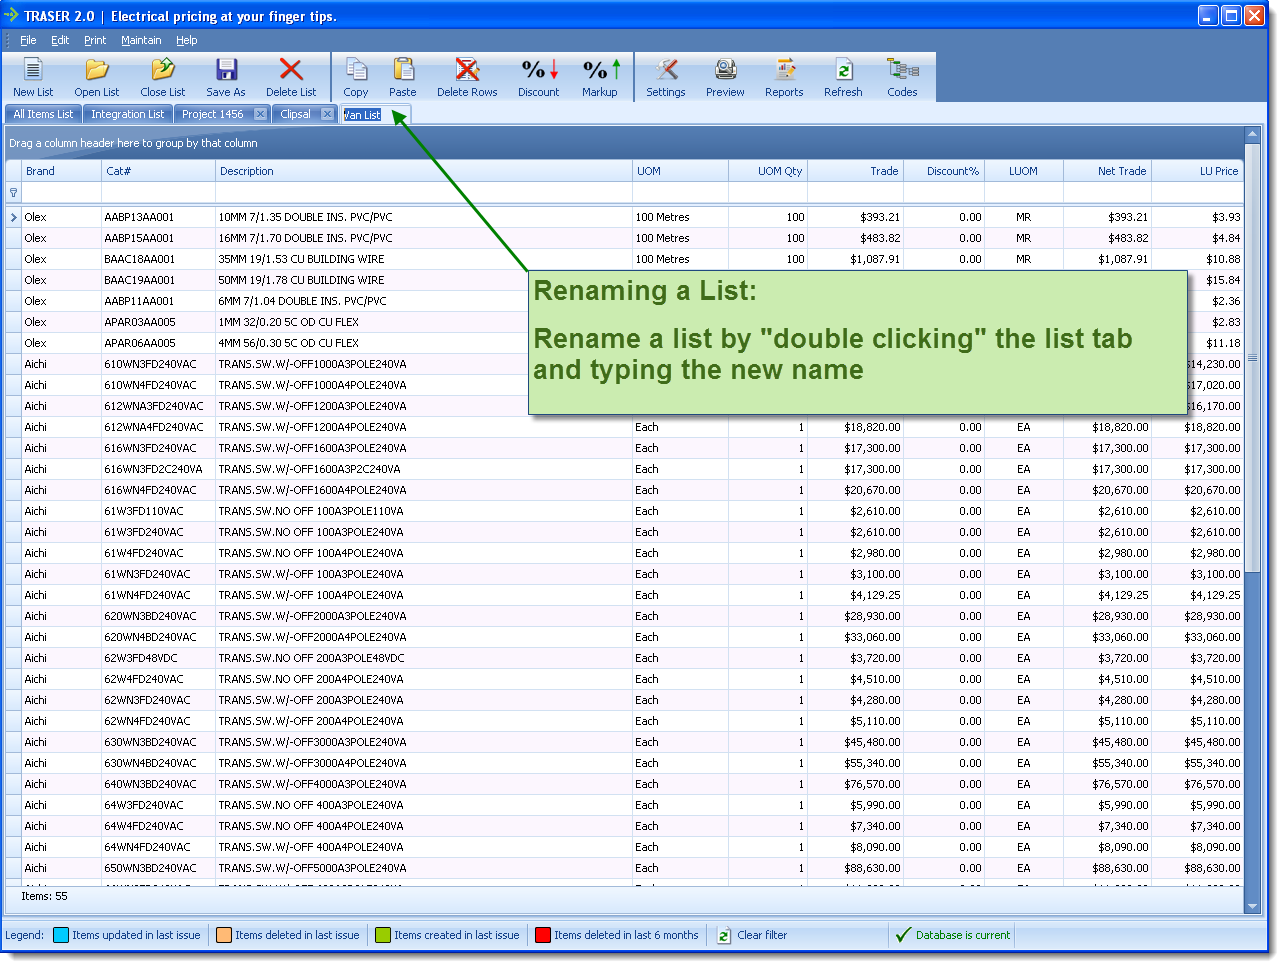
How can I rename my list?
Back to top
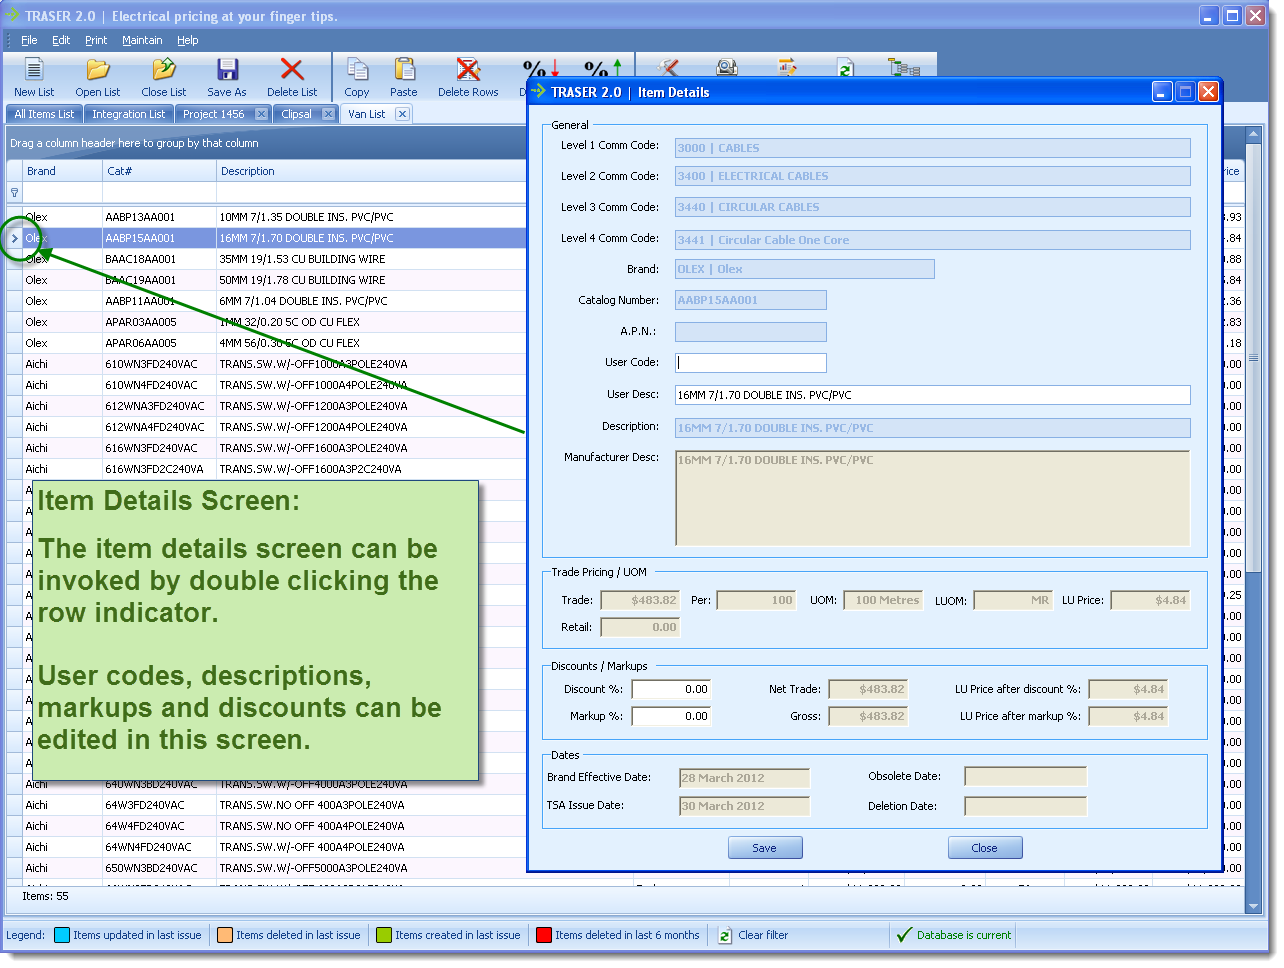
How can I view the details of an item?
Back to top
What operations can I perform on the columns?

Back to top
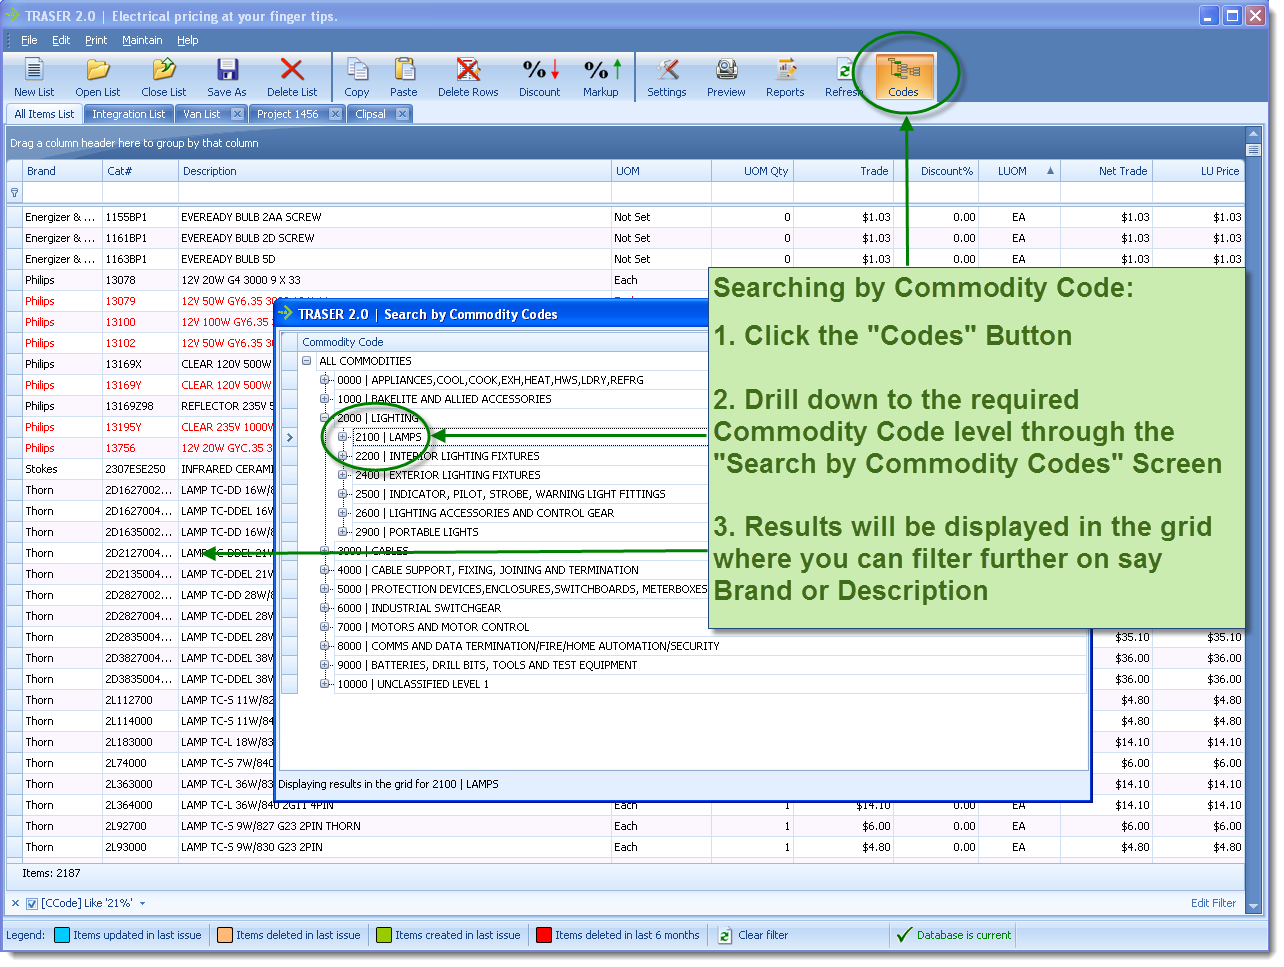
How can I search by Commodity Codes?
Back to top
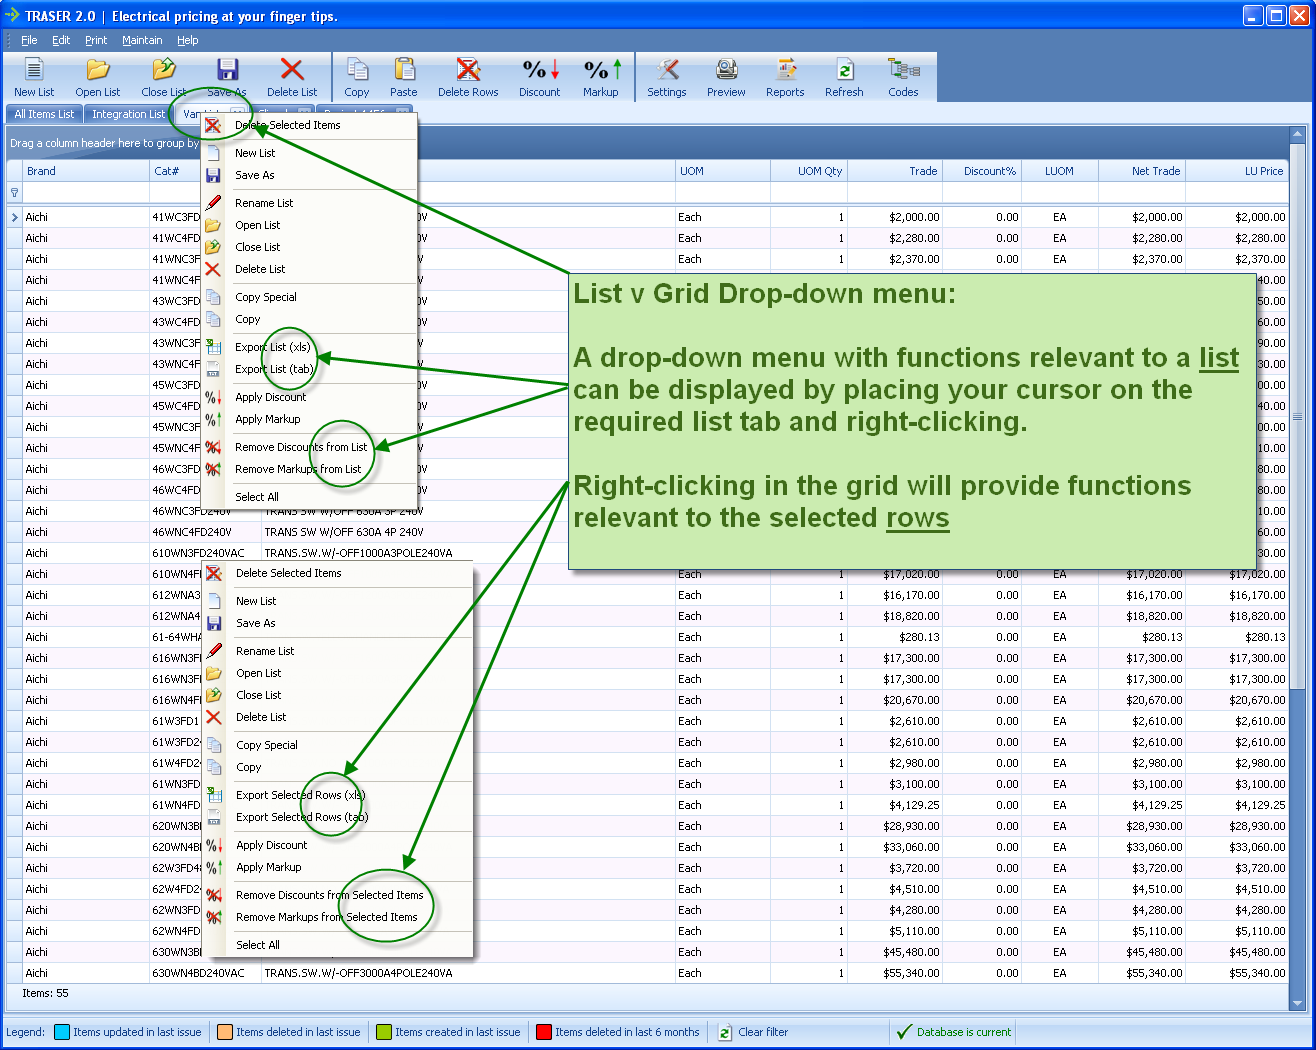
Depending upon where I right-click, I see a different context menu. Why?
Back to top
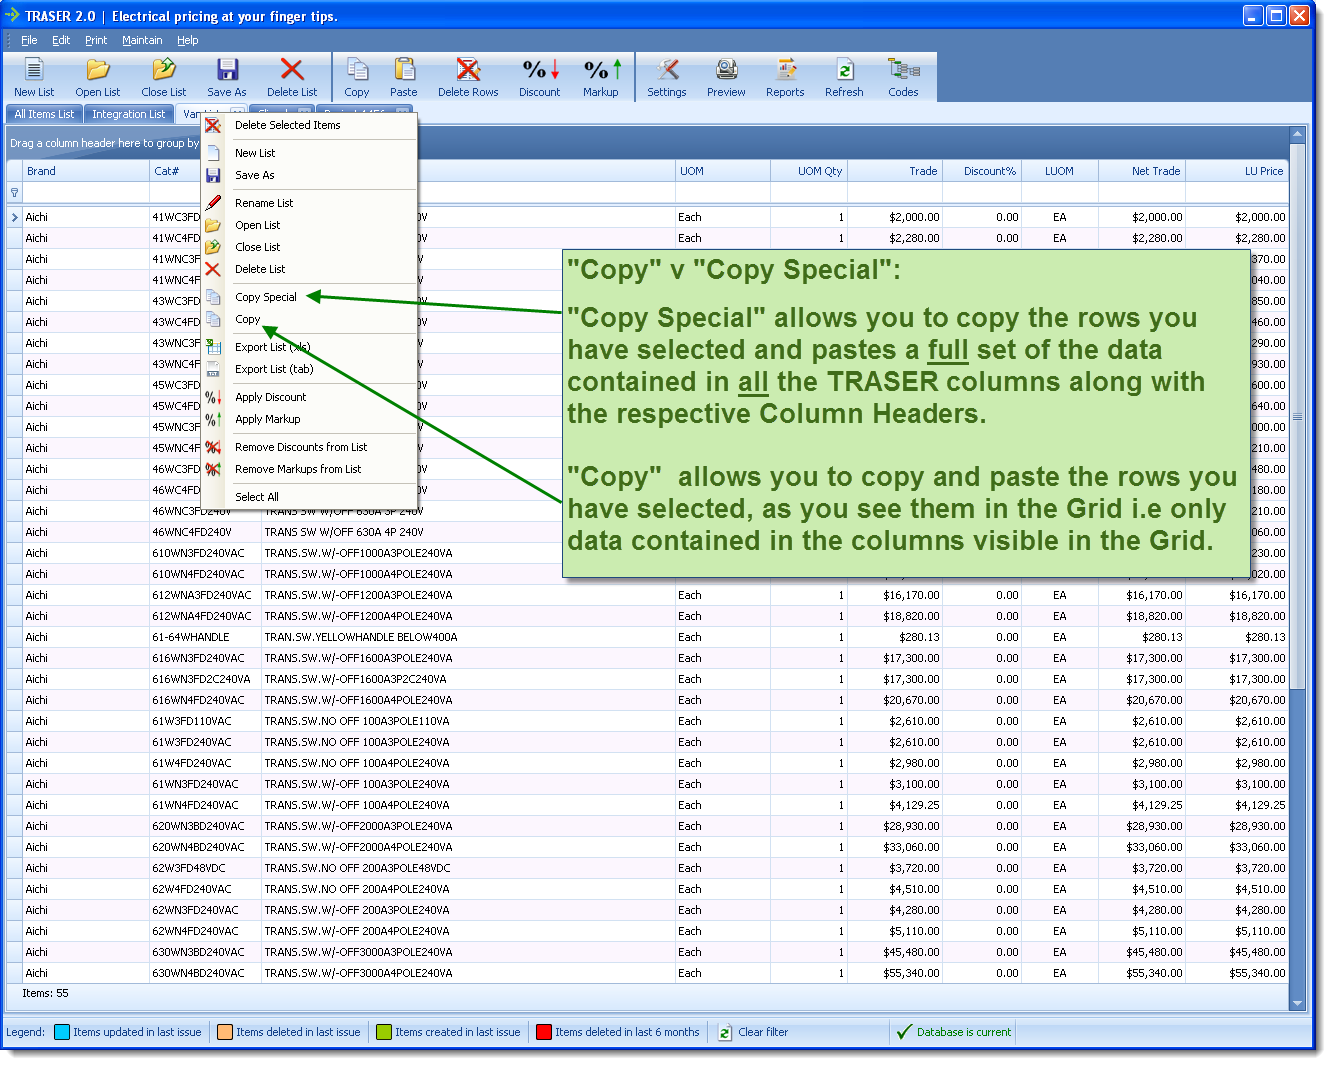
In the context menu, what is the difference between 'Copy' and 'Copy Special'?
Back to top
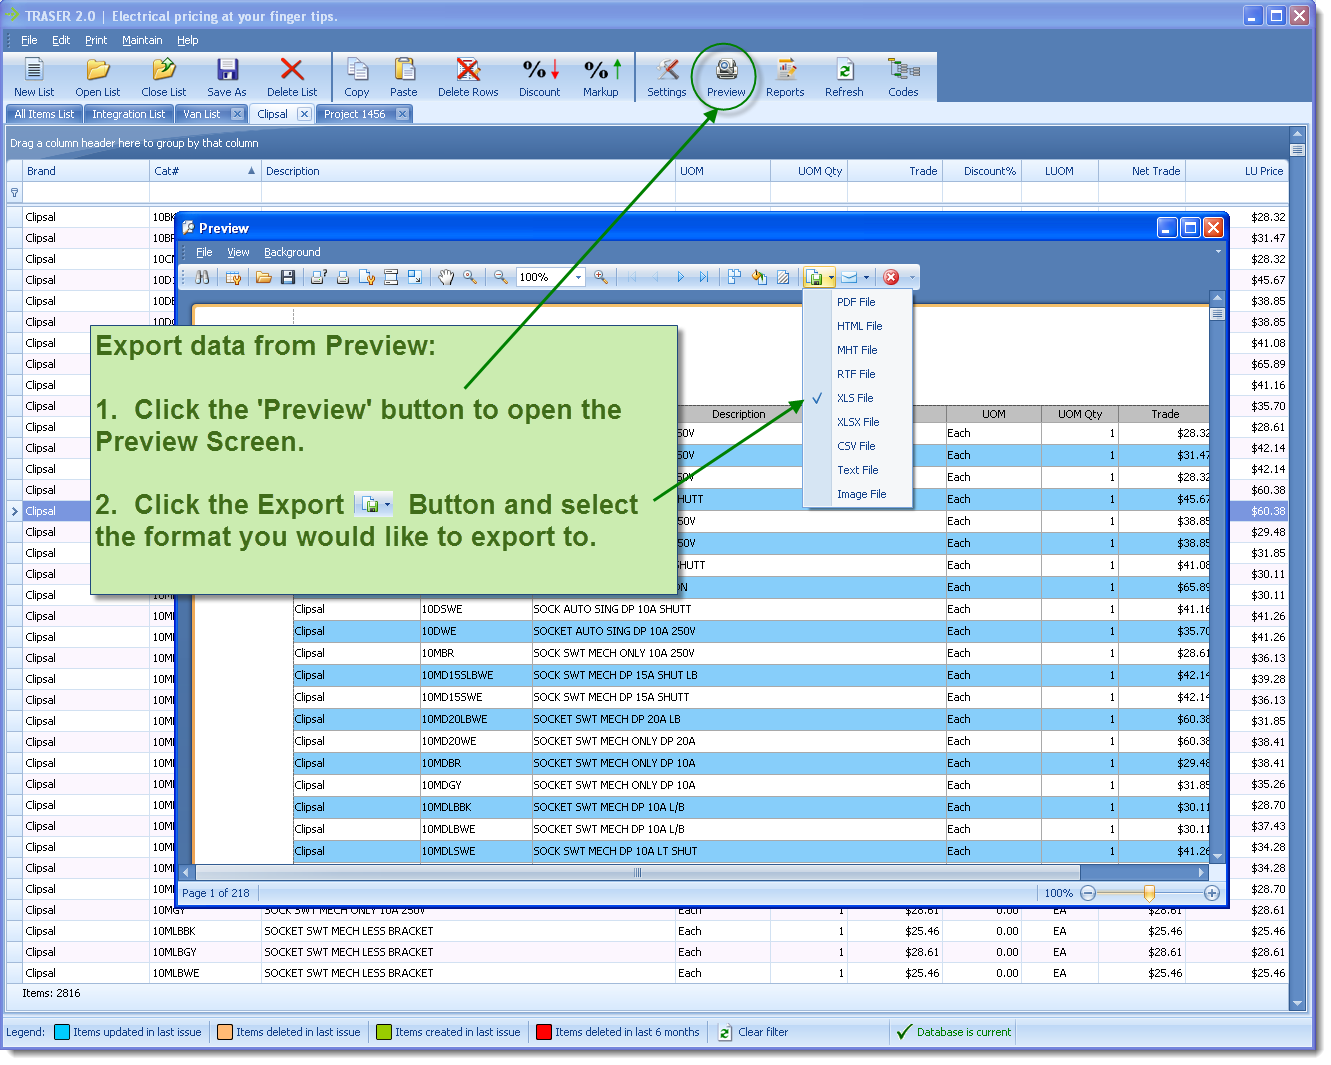
How can I export data out of TRASER 2.0?
Back to top
I am getting a Microsoft file missing error when TRASER 2.0 is updating itself. What do I do?
This is most likely a missing Shared Management Object that is required.
First, determine if your machine is 64-bit or not. Next, if your machine is a 64-bit computer, please download and install the following 2 components:
If your machine is a 32-bit computer, please download and install the following 2 components:
After doing the installation of these two components, please go to the TRASER 2.0 installation directory (default location: c:\Program Files\Traser 2.0\) and execute (by double-clicking it) T2DBUpdater.exe.
If all goes well, it should update the database and close by itself. If it doesn't work still, please call Trade Service of Australia.
Back to top
I want to import some items that do not exist in TRASER 2.0. What do I do?
Now, with TRASER 2.0, you can easily import your:
- supplier price files,
- your own internally-used items, or
- other brand items
Importing these items is a two-step process:
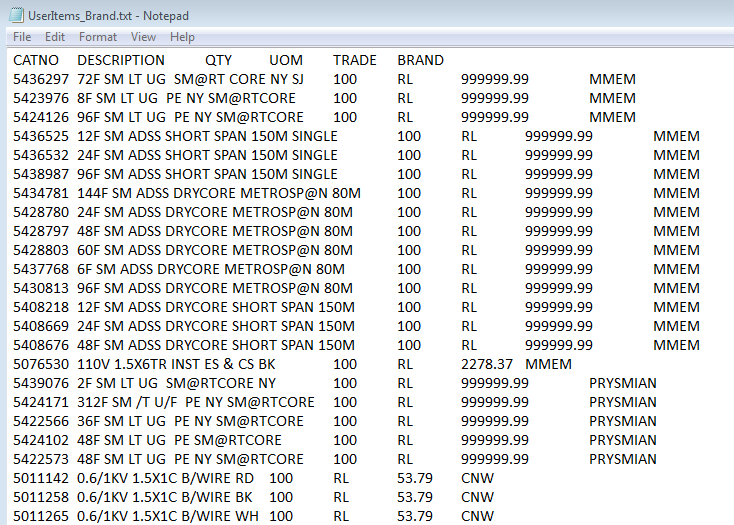
- Create a tab-delimited file - What that means is that the field values should be separated by a "tab". The file must have a header row that contains the column names. The following columns MUST be in the file (the order is not important):
- CATNO - Catalog Number upto 30 characters
- BRAND - Upto 50 characters. This is to help you identify the items when imported into your list. This can contain the Brand or supplier name.
- DESCRIPTION - Upto 50 characters
- TRADE - Trade Price
- QTY - How many for the Trade Price - this can be decimal - eg: 2.4
- UOM - Unit of measure - 2 characters and must be one of the following:
- EA = Each
- PK = Pack
- RL = Roll / Reel
- LN = Length
- BX = Box
- Import the file into TRASER 2.0 - You can import the file in one of two ways:
- Choose File->Import User Items
- Open list "User-Added Items", if it is not open already. Right click in that list anywhere and choose "Import User Items"
Either way, you will be presented with the same screen. Simply follow the prompts and you are done.
Handy hints while creating the file:
- To specify 2.4 metre length - use QTY=2.4 and UOM=LN
- To specify a Pack of 100 - use QTY=100 and UOM=PK
- To specify a Roll of 350 metres - use QTY=350 and UOM=RL
- If your item's price is POA, then specify the price as 999999.99. TRASER 2.0 will display POA for that price.
- If your file is an Excel spreadsheet, simply save it as "Text (Tab delimited)"
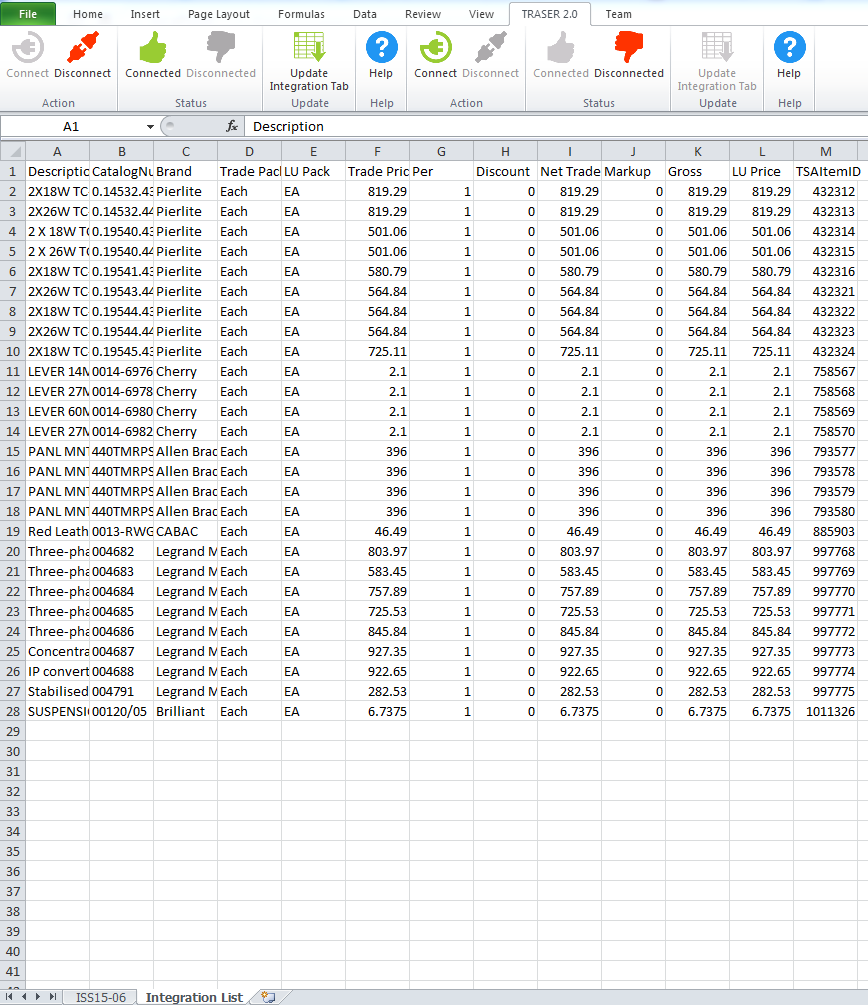
Below is a sample of a tab-delimited file.
Back to top
I want only certain people to view certain lists. How do I do that?
You can password-protect a list. Follow these steps:
- Open the list.
- Right-click anywhere in that list and you will be presented with a contextual menu.
- Select 'Password-Protect List' from the menu options.
- Provide the password and re-confirm the password.
- Click 'Set Password' and you are done.
Once you have set a password on a list, anytime someone goes to open that list - they will be prompted to provide the password.
Back to top
I want to configure TRASER 2.0 on the terminal server where it will be accessed by multiple users. What do I need to do?
Use this process only if you will have multiple users accessing TRASER 2.0 concurrently on the terminal server. If it is only going to be single user on the terminal server, then you do not need this process.
Please follow the outlined steps to configure the terminal server to allow TRASER 2.0 to serve multiple users:
- Locate the traser.exe.config file in your TRASER 2.0 install directory.
- Open the file in notepad and search for the key "EnablePortSharing". Set the value of this key to "true". If this key is not available, then your TRASER 2.0 installation is not up-to-date. Please update it by double-clicking and running the wyupdate.exe file.
- Once you have edited the key above, please save the file and close it down.
- Open up the "Local services" panel. You can do this by opening up Control Panel and then searching for "local services".
- Inside that panel, look for "Net.Tcp Port Sharing Service". Please see image below.
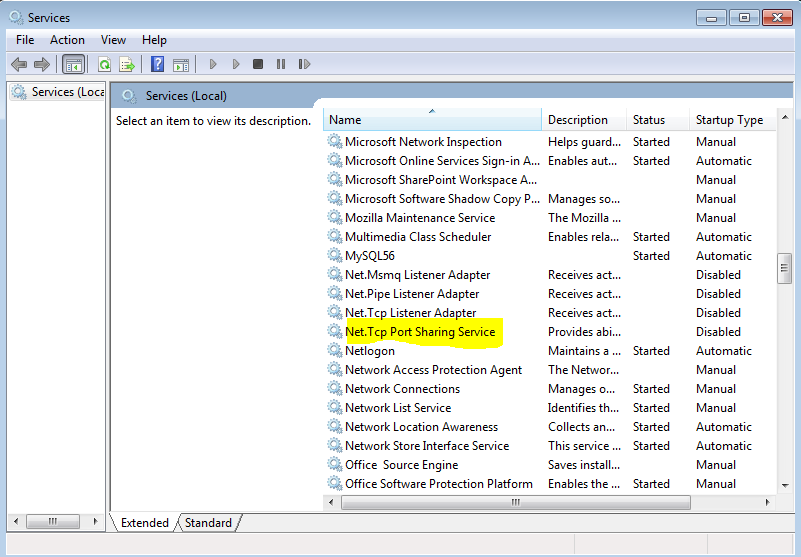
- Double-click the "Net.Tcp Port Sharing Service".
- It will present you with the screen below. Note the highlighted path.
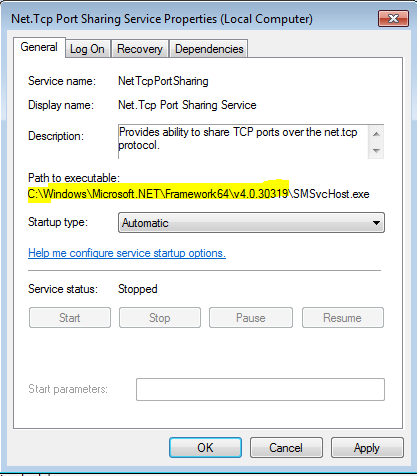
- Leave the panel open and open up a windows explorer and navigate to the highlighted path.
- Locate a file called SMSvcHost.exe.config. Open it in notepad.
- Refer to the directions below to add all the SIDS of all the users who would be using TRASER 2.0 on the terminal server:
- You need to get SIDS of all users. You can download PsGetSid (this will give you the Security Identifier - SID for your user)
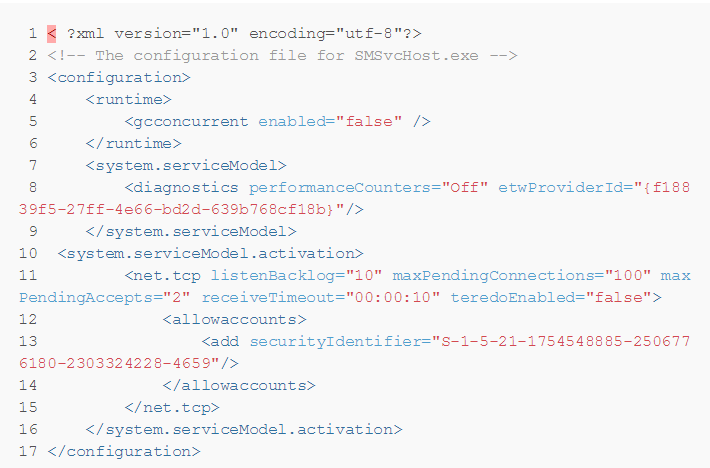
- Run psgetsid.exe to get the SID ( should look something like this S-1-5-21-1754548885-2506776180-2303324228-4659 )
- By default the SMSvcHost.exe.config contains a section which has a child which has a child. The IMPORTANT part if you are using an editor that does not do syntax highlight for XML - THE ABOVE SECTION IS COMMENTED by DEFAULT so adding child has not effect.
- YOU NEED TO ADD A NEW SECTION with it's children sections to make it work ( or uncomment the existing one and removing the // comments which are not valid xml ).
- See below how the file should look, you can download a sample file here and edit it accordingly.
- Once you have added the relevant SIDS, please save the file and close it down.
- Go back to the Net.Tcp Port Sharing service panel and set the startup type to "Automatic" and hit apply.
- Start the service, or if it is already running - please restart the service. If it fails to start, then your earlier editing of the file was not accurate. That file does not like comments in it, please remove any comments in that file, save it and then try starting the service.
Back to top
I want to configure TRASER 2.0 to work with my Excel. What do I need to do?
This FAQ assumes that you have TRASER 2.0 installed already and you also have EXCEL 2010. In order to get TRASER 2.0 to communicate with your EXCEL, follow the steps below:
- Make sure TRASER 2.0 is running.
- Open up your EXCEL and make sure that the TRASER 2.0 tab is visible.

- Once TRASER 2.0 is running, then click 'Connect' button in the EXCEL TRASER 2.0 tab.
- Now, you should be connected to TRASER 2.0 and a button will show up on TRASER 2.0.

- Find your items in TRASER 2.0 in 'All Items List'. Then drag/drop them either onto the button 'Excel' or into the 'Integration List'.
- Items will appear in a new tab called 'Integration List'.
- Thereafter, clicking 'Update Integration Tab' on the EXCEL TRASER 2.0 tab will automatically update items in your EXCEL 'Integration List' tab.
Once you have the 'Integration List' tab items in your EXCEL, you should use references to those item values in your EXCEL spreadsheet.
Sometimes, the communication might not occur properly. In such a case, re-starting EXCEL and TRASER 2.0 should fix the communication issues.
Back to top
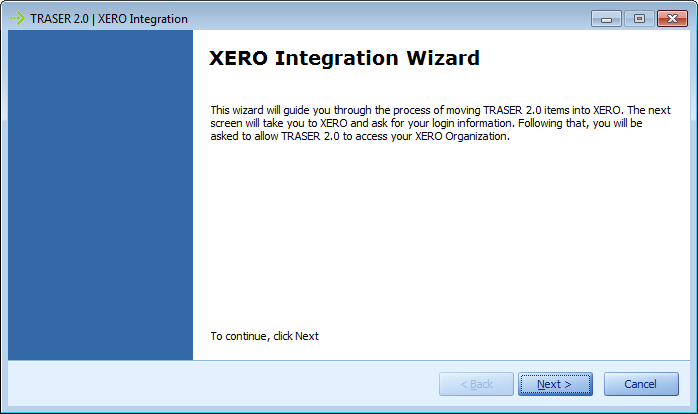
I want to configure TRASER 2.0 to work with XERO. What do I need to do?
This FAQ assumes that you already have TRASER 2.0 installed already and you also have a XERO account. In order to get TRASER 2.0 to communicate with your XERO account, follow the steps below:
- Open up Traser.exe.config file. It is located in your TRASER 2.0 installation folder (usually located at C:\Program Files\TRASER 2.0).
- Look for the key's XERO_ConsumerKey and XERO_ConsumerSecret. Once located, put in your account values as assigned by XERO.
- Open up TRASER 2.0 and open up your list that you want to push into XERO.
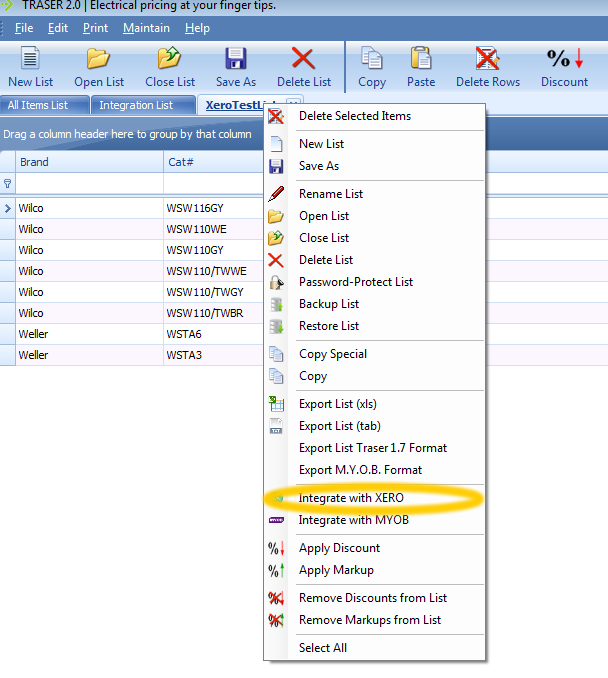
- Right-click on the list tab (where the list name is displayed). This will present you with a context menu (as below). Choose "Integrate with XERO".
- You will be presented with a wizard that will walk you through the integration process.
Back to top
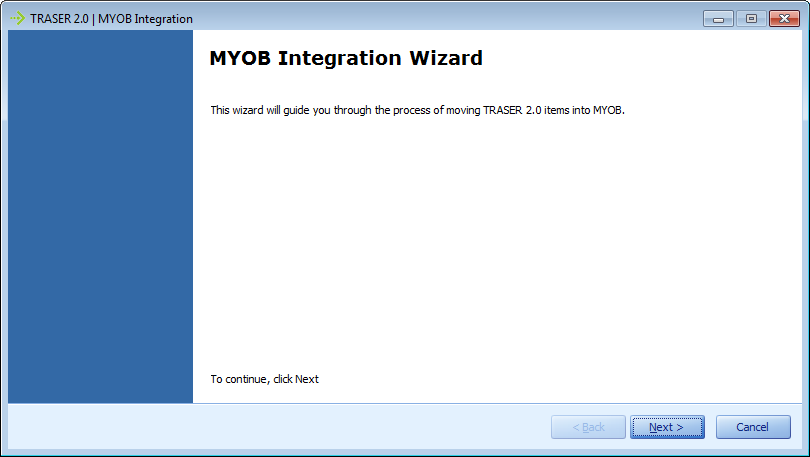
I want to configure TRASER 2.0 to work with MYOB. What do I need to do?
This FAQ assumes that you already have TRASER 2.0 installed already and you also have MYOB installed. In order to get TRASER 2.0 to integarte with your MYOB, follow the steps below:
- Please ensure that the MYOB Add-on Connector is installed and is working properly. Best way to ensure that is to navigate to the URL below. If MYOB is working correctly, it should display a list of MYOB Company Files:
http://localhost:8080/accountright
- If the above works fine, then proceed. If not, please contact MYOB or visit the URL below for more details:
MYOB AccountRight Installer
- Open up TRASER 2.0 and open up your list that you want to push into MYOB.
- Right-click on the list tab (where the list name is displayed). This will present you with a context menu (as below). Choose "Integrate with MYOB".
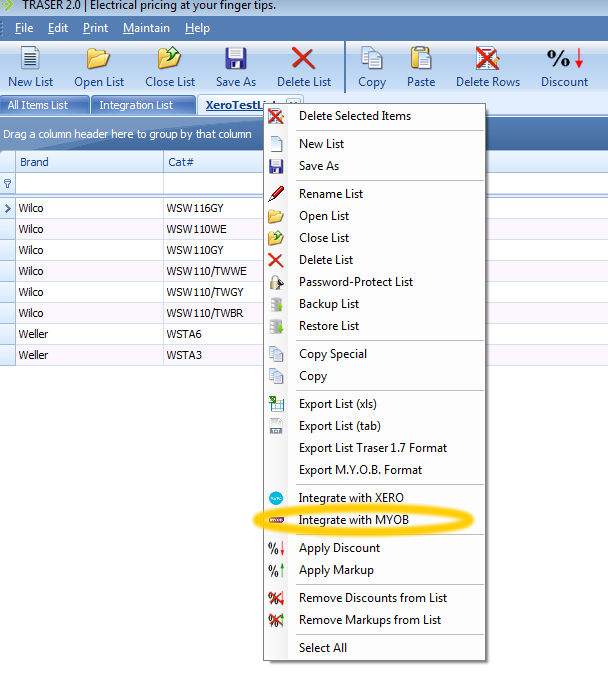
- You will be presented with a wizard that will walk you through the integration process.
Back to top
|