|
How do I create a Selected Items List?
- Open up TRA-SER for Windows
- Go to File>New and select “Selected Item List”

- Fill in the details
- Once you have completed filling in the details, click OK
- Your newly created list is created next to the “All Items” list.
- To add items to your newly created list, just click and drag the items from the “All Items” list to your newly created list.
How do I Create a Custom Pricing List?
- Open up TRA-SER for Windows
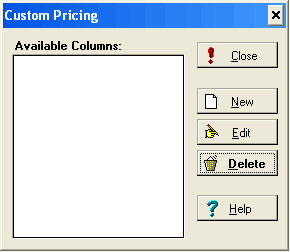
- Go to Maintain>Custom Pricing
- A dialog box will appear called “Custom Pricing”
- Click on the New button
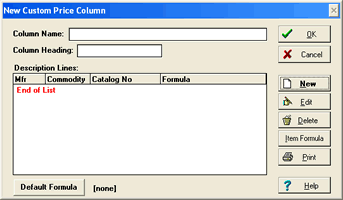
- A “New Custom Price Column” dialog box will appear.
- Enter the Column Name and Column Heading. Then click on the New button.
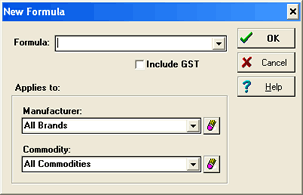
- A “New Formula” dialog box will appear.
- Select the formula in the dropdown box. E.g STDTRADE + 20%
- Select the Manufacturer. E.g Clipsal
- Then click OK
- Then click OK again.
- You should now see the column name that you have created in the “Custom Pricing dialog”
- Click Close
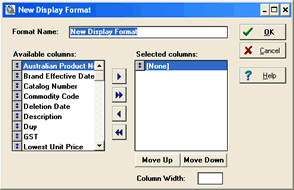
- Go to Maintain>Display Formats
- A “Display Format” dialog box will appear and click on the New button.
- A “New Display Format” dialog box will appear.
- Enter the Format Name in the Format Name field.
- In the Available columns list, select the appropriate fields that you wish to be displayed, making sure that you select the Custom Pricing Column that you have created.
- Once you have selected the fields click OK.
- And then click Close
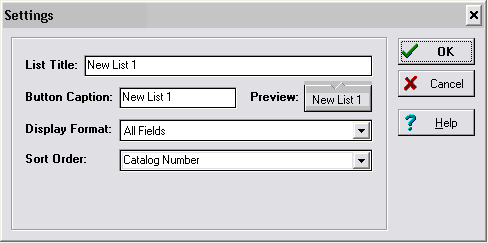
- Go to File>New and select the “Selected Item List” and click OK
- Enter the Title and the Button Caption.
- In the Display Format dropdown box select your display format. Then click OK.
- A new list will appear displaying the fields that you have selected earlier.
- Now go to the manufacturer that you have selected. E.g Clipsal and drag some items in the new selected list.
How do I create a Custom Pricing List for a particular brand?
- Open TRA-SER
- Go to Maintain>Custom Pricing. The Custom Pricing screen will display. Click on the New icon. The New Custom Pricing Column screen will display.
- Click inside the Column Name field and type the name of the Column. (e.g Clipsal Invoice)
- Click inside the Column Heading field and type the name of the Column Heading. (e.g Clipsal)
- After you have completed entering in the names click on the New button. A New Formula screen will display.
- Click on the Down arrow next to the Formula field. A drop down box will display the price options available for input in this field. It is possible to scroll through the list to view price options not currently visible.
- Click on one of the price options. Discounts or markups can be applied by selecting the (+), (-), (*) sign. Percentage variations may also be applied by typing the figure followed by a percentage sign (e.g 20%).
- Click inside the Formula Field to insert the discount or markup variations.
- Type in the Variation amount. This figure may be a dollar amount or a percentage value. (e.g 10.50 or 2.75%)
- Click on the Down arrow next to the Manufacturer field. A drop down box will display the available manufacturers. Scroll through the box and select the manufacture or type in the manufacturer's name.
- Select the appropriate Manufacturer.
- Select the Down arrow next to the Commodity field. A drop down box will display a listing of the commodity groupings.
- Select the relevant Commodity
- Click the OK button once you have completed filling out the form. The formula will be created and added to the edit screen. Click OK to accept the formula and then close the Custom Pricing dialog box
- To be able to add items to a new list click on the Display Format icon.
- Select the New button. The New Display Format screen will appear.
- Type in the Name of the new format, in the Format Name field. (e.g Clipsal Invoice)
- Highlight a Column in the Available Columns list to select a column to be included in the new display format. (e.g Clipsal Invoice)
- Click on the Single Right Arrow icon.
- Once that has been completed click the OK button. A New Display Format is created. Close the Display Format dialog box.
- Now click on the New icon. The New List dialog box will display with the Selected Item List entry highlighted.
- Click the OK button. The Settings dialog box will display.
- Click inside the List Title field and type in a name (e.g Clipsal Invoice). The List Title name will appear in the Title Bar of the TRA-SER for Windows window.
- Click inside the Button Caption field and type in the name for the button (e.g Clipsal Invoice). The Button Caption name will appear in the Open List Scroll Bar.
- Click the down arrow on the Display Format and you will see the display format which you created in the previous step. (e.g Clipsal Invoice).
- Click OK.
- To add items to the list you have created click on the All Items button and click and drag the items that you would like to have into the new items list (e.g Clipsal Invoice).
How do I create a Custom Pricing List?
- Open TRA-SER
- Go to Maintain>Custom Pricing. The Custom Pricing screen will display. Click on the New icon. The New Custom Pricing Column screen will display.
- Click inside the Column Name field and type the name of the Column. (e.g Clipsal Invoice)
- Click inside the Column Heading field and type the name of the Column Heading. (e.g Clipsal)
- After you have completed entering in the names click on the Default Formula button. A New Formula screen will display.
- Click on the Down arrow next to the Formula field. A drop down box will display the price options available for input in this field. It is possible to scroll through the list to view price options not currently visible.
- Click on one of the price options. Discounts or markups can be applied by selecting the (+), (-), (*) sign. Percentage variations may also be applied by typing the figure followed by a percentage sign (e.g 20%).
- Click inside the Formula Field to insert the discount or markup variations.
- Type in the Variation amount. This figure may be a dollar amount or a percentage value. (e.g 10.50 or 2.75%)
- Click the OK button once you have completed filling out the form. The formula will be created and added to the edit screen. Click OK to accept the formula and then close the Custom Pricing dialog box
- To be able to add items to a new list click on the Display Format icon.
- Select the New button. The New Display Format screen will appear.
- Type in the Name of the new format, in the Format Name field. (e.g Clipsal Invoice)
- Highlight a Column in the Available Columns list to select a column to be included in the new display format. (e.g Clipsal Invoice)
- Click on the Single Right Arrow icon.
- Once that has been completed click the OK button. A New Display Format is created. Close the Display Format dialog box.
- Now click on the New icon. The New List dialog box will display with the Selected Item List entry highlighted.
- Click the OK button. The Settings dialog box will display.
- Click inside the List Title field and type in a name (e.g Clipsal Invoice). The List Title name wil appear in the Title Bar of the TRA-SER for Windows window.
- Click inside the Button Caption field and type in the name for the button (e.g Clipsal Invoice). The Button Caption name will appear in the Open List Scroll Bar.
- Click the down arrow on the Display Format and you will see the display format which you created in the previous step. (e.g Clipsal Invoice).
- Click OK.
- To add items to the list you have created click on the All Items button and click and drag the items that you would like to have into the new items list (e.g Clipsal Invoice).
How do I create a Custom Pricing List for a particular item?
- Open TRA-SER
- Create a Selected Items List (if you don’t know how to create a Selected Items List, please refer to page 2)
- In the Selected Items List, highlight the items in which you want to either add markups or discounts.
- Go to Maintain>Custom Pricing. The Custom Pricing screen will display. Click on the New icon. The New Custom Pricing Column screen will display.
- Click inside the Column Name field and type the name of the Column. (e.g Clipsal Invoice)
- Click inside the Column Heading field and type the name of the Column Heading. (e.g Clipsal)
- After you have completed entering in the names click on the Item Formula button. A New Formula screen will display.
- Click on the Down arrow next to the Formula field. A drop down box will display the price options available for input in this field. It is possible to scroll through the list to view price options not currently visible.
- Click on one of the price options. Discounts or markups can be applied by selecting the (+), (-), (*) sign. Percentage variations may also be applied by typing the figure followed by a percentage sign (e.g 20%).
- Click inside the Formula Field to insert the discount or markup variations.
- Type in the Variation amount. This figure may be a dollar amount or a percentage value. (e.g 10.50 or 2.75%)
- Click the OK button once you have completed filling out the form. The formula will be created and added to the edit screen. Click OK to accept the formula and then close the Custom Pricing dialog box
- To be able to add items to a new list click on the Display Format icon. Close the Display Format dialog box.
- Select the New button. The New Display Format screen will appear.
- Type in the Name of the new format, in the Format Name field. (e.g Clipsal Invoice)
- Highlight a Column in the Available Columns list to select a column to be included in the new display format. (e.g Clipsal Invoice)
- Click on the Single Right Arrow icon.
- Once that has been completed click the OK button. A New Display Format is created.
- To add edit your Selected Items List to display your new display format, click on the Settings button

- In the Display Format drop-down button, select your new display format.
How do I extract/unzip my TRA-SER updates? And how do I update TRA-SER?
The updates must be installed as soon as you receive them, otherwise the data in TRA-SER becomes outdated. TRA-SER will only allow the updates to be installed in sequence.
WEBSITE - Visit the website on a regularly basis to check whether an update has been added. To gain access to the Downloads page you must have a valid username and password. If you unable to login or can't remember your password email support or call TRA-SER customer support on (07) 3376 6944 and we will resolve your situation.
Once you have logged in, you will see all the issues that you are able to download. There is a maximum of 6 issues that will be displayed and if you are unable to see the issue that your missing please contact support and we will re-issue that update to you.
In order to download the issues, select one of the two formats: EXE, ZIP (If you are a PFM user select the REQ column). The two formats are created as WinZip executables and are unzipped via the WinZip Self Extracting process.
- (TRA-SER Users) ISSxxxxx.exe - Download the file from the website and save it on the desktop. Double click on the file to bring up the WinZip Self-Extractor screen and click on the Unzip button if the default directory is correct. If you need to change folders, click on the Browse button to choose the Update folder in your TRA-SER directory.ISSxxxxx.zip - If you are with using WinZip, then download this file and save it to your desktop. Double click on the file to launch the WinZip application. The WinZip application screen is displayed with the update file listed. Click on the Extract button and choose the destination directory for the file. The default is C:\Program Files\Traser\Update.
- (TRA-SER Lite Users) update.exe - Download the file from the website and save it on the desktop. Double click on the file to bring up the WinZip Self-Extractor screen and click on the Unzip button if the default directory is correct. If you need to change folders, click on the Browse button to choose the Update folder in your TRA-SER directory.
- (PFM Users) 00050.req - Download the file from the website and save it to a location.
DISK - Using My Computer or Windows Explorer located the issue update file on the A: drive. The file is on the format for TRA-SER Users ISSxxxxx.exe and 00050.req for PFM Users. Double click on the file to start the unzip process to copy the update file into your Update folder. If the installation directory was different to the default when installing TRA-SER, click on the Browse button to locate the Update folder under the TRA-SER directory. Once you have selected the Update folder, click the Unzip button. The file will be extracted to the Update folder. A message will be displayed that the file unzipped successfully. Click OK to close the message screen and click the Close button to close the WinZip Self-Extractor screen.
LOADING ISSUE UPDATES - Now the issue update file is in the Update folder.
- Click Start>Programs>TRA-SER for Windows>TRA-SER update to begin the update process. The TRA-SER Update screen is displayed.
- Click the Update Now button. The Select TRA-SER Update File screen opens to select the issue update file. If the default location does not contain the file, locate the file in the Update folder in the TRA-SER directory. The file format for TRA-SER is ISSxxxxx.tup and TRA-SER 1.6/Lite is update.all
- Identify the update file you wish to load, based on the date of the issue.
- Click on the file to highlight the file and click OK to begin updating TRA-SER. Progress of the update is displayed in the Update screen.
- When the operation is completed, click OK.
I get an error "Cannot gain exclusive access to TRA-SER(1/5/9) system"
The two problems that can cause this error to display are either you still have TRA-SER open or your data is corrupted. The solution to fixed this error is to close all TRA-SER programs and start the update process again, if problem still occurs run Rebuild.exe, which is located in your TRA-SER directory.
I get an error "ERROR: TRASER DATA IS OUT OF DATE"
This error usually occurs when your TRA-SER system is out of date. Check your last update and if it is out of date run an Issue Update prior to your last update. To check what data version you are currently on, open TRA-SER for Windows and go to Help>About TRA-SER. In the Current Data Version field it should display the lastest update (e.g. Current Data Version: xx/xx/xxxx (xx/xx/xxxx is the date)). If they are missing an update, go to Update Issue>Adding issue updates for Customer in the Procedures/Task tab
I get an error "ERROR: CODE BASED ERROR"
There is an error or your data file is corrupted. To fix this error run Rebuild.exe, if error still occurs re-install TRA-SER and run an Initial Load.
I get an error "ERROR: INCORRECT VERSION OF TRASER"
Your TRA-SER system is either outdated or is corrupted. To fixed this error run an Issue update prior to your last update or run a Rebuild.exe, which is located in your TRA-SER directory.
I get an error "ERROR: TRA-SER System Has Invalid Release Date"
Your TRA-SER data is corrupted. You will require a new initial load.
I get an error "ERROR: CANNOT PROCESS: UPDATE OUT OF DATE"
This error usually occurs when your TRA-SER system is outdated. Check your last update and if it is out of date run an Issue Update prior to your last update. To check what data version you are currently on, open TRA-SER for Windows and go to Help>About TRA-SER. In the Current Data Version field it should display the lastest update (e.g. Current Data Version: xx/xx/xxxx).
I get an error "ERROR: TRASER SYSTEM IS UNREGISTERED"
Update Issues has not been applied for a period of 3 months therefore you will a new Initial Load.
I get an error "ERROR: Update must run in sequence"
You are missing an update and trying to update your TRA-SER with the lastest update. To check what data version you are currently on, open TRA-SER for Windows and go to Help>About TRA-SER. In the Current Data Version field it should display the lastest update (e.g. Current Data Version: xx/xx/xxxx (xx/xx/xxxx is the date)).
I need a new Initial Load, what do I do?
TRASER IL's are now available on the website. To download the IL, you must be an active subscriber and should be able to login to our website. The download link is available on download updates screen.
Can TRA-SER export data to other third party systems? If so what are they?
TRA-SER has the ability to export your custom pricing list or selected filtered list to other third party systems. TRA-SER can export data to ASCII Text File, Arrow, MYOB, QuickBooks and Tradesman.
I have installed TRA-SER on to a server. How do the workstations access TRA-SER?
To run TRA-SER on a network it must first be installed on the server or main computer. Also the directory must be shared for all computers on the network that will be running TRA-SER.
- Install the program on the server.
- To share the TRA-SER folder select the folder in My Computer or Windows Explorer. Right click on the TRA-SER folder and choose sharing. Make sure the Share this folder option is selected and the Share Name is TRASER.
- Click OK to close the screen and the TRA-SER folder should appear with a hand underneath the folder icon to indicate it is a shared folder.
- To ensure TRA-SER to be accessible on each computer, the server's shared drive must be mapped on each computer that will be using TRA-SER. Note: In order to allow more than one user, you must be licensed depending on how many users you require.
- Using Windows Explorer go to Tools>Map Network Drive. A Map Network Drive dialog will appear. If you are not sure how to map a drive, please contact your systems administrator.
- Once the drive is mapped locate the wrkstn.exe in the TRA-SER directory and double click to install TRA-SER on the workstation. When the installation is complete TRA-SER is ready to use.
What do I do if I want specific brand(s) updated?
To request for a specific brand that you would like to be updated please call TRA-SER customer support on (07) 3376 6944 or email support.
How do I add my own Brand and Items?
- Open TRA-SER
- Go to Maintain>Brands
- Click on the New button and enter in the Brand name
- To add items, go to Edit>Add Items
- Fill in the form
I have received my TRA-SER program and it has asked me to register, what do I do?
Before running TRA-SER for the first time, the program must be registered.
- Click on Start>Programs>TRA-SER for Windows>TRA-SER Registration to begin the registration process.
- The TRA-SER Registration screen will appear with the serial number specific to the installation of TRA-SER.Note: The Serial Number is generated each time the Registration screen is displayed. You need to leave this screen open.
- Call up TRA-SER customer support on (07) 3376 6944 and give that registration number.
- Once TRA-SER customer support gives you back a registration number, put that in the specified box.
I can’t login to download my updates?
- Ensure you are using the proper username/password combination. If you are not sure about your password, you can always reset it.
- If you stillcan't login, please contact TRA-SER customer support on (07) 3376 6944
Why doesn’t TRA-SER work with Vista?
In order for TRA-SER to work in Vista, the user must deactivate the UAC (User Account Control). To do this:
- Go to Control Panel>User Accounts
- Turn off the UAC control.
I’ve extracted/unzipped my update, but I can’t find it when I’m trying to update TRA-SER in the Select TRA-SER file dialog box?
When extracting the file the default location is C:\Program Files\Traser\Update
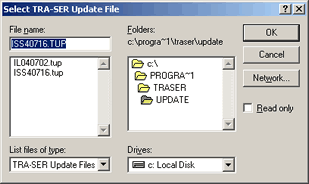 - Open TRA-SER Update
- Click Update Now
- The Select TRA-SER Update File screen opens to select the issue update file. If the default location does not contain the file (C:\Program Files\Traser\Update), locate the ISSxxxxxx.tup file.
- Make sure that the Drives drop-down is pointed to C:\
- Make sure that the Folders field is c:\progra~1\traser\update
- Identify the update file you wish to load, based on the date of the issue, e.g. the update for 16 July 2007 would be ISS040716.tup. Click on the ISSxxxxxx.tup file to highlight the file and click OK to begin the updating TRASER.
How do I delete a list from TRASER?
When extracting the file the default location is C:\Program Files\Traser\Update
- Open TRA-SER for Windows
- Make sure that list is closed
- Select the list that you want to close
- Go to File>Close
- If it asks you to save select NO
- Go to C:\Program Files\Traser
- In the directory there should be files with the file extension of .itm e.g vanlist.itm
- Select the list that you want to delete
I am having trouble installing TRASER on Vista / Windows 7. What can I do?
Disable UAC on Windows Vista
Open up Control Panel, and type in “UAC” into the search box. You’ll see a link for “Turn User Account Control (UAC) on or off”:
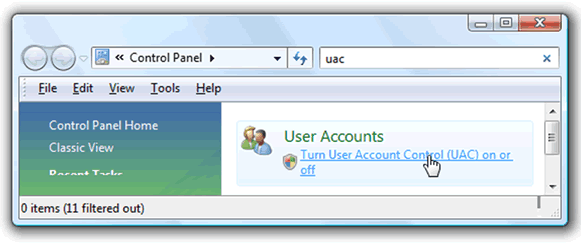
On the next screen you should uncheck the box for “Use User Account Control (UAC)”, and then click on the OK button.

You’ll need to reboot your computer before the changes take effect, but you should be able to install TRASER now.
Disable UAC on Windows 7
Windows 7 makes it much easier to deal with UAC settings, and in fact you don’t have to completely disable UAC if you don’t want to. Just type UAC into the start menu or Control Panel search box.
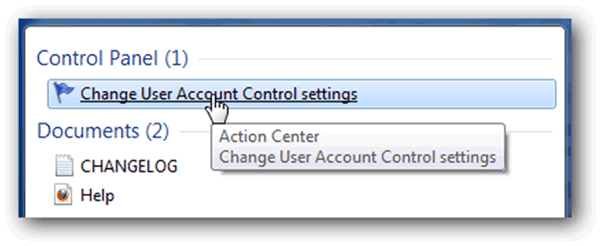
You can simply drag the slider up or down, depending on how often you want to be alerted.
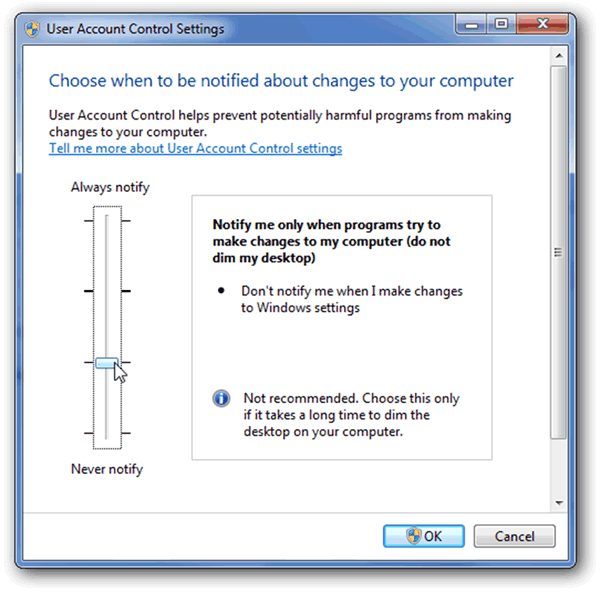
If you drag it all the way down to the bottom, you’ll have disabled it entirely.
How can I run TRASER ® in Compatibility Mode in Windows 7?
What is "Compatibility Mode"?
Compatibility mode allows a older program written for an earlier versions of Windows to possibly run in Windows 7. You can also use Compatibility mode to always have a program to "Run as administrator".
What do I do to run TRASER ® in compatibility mode?
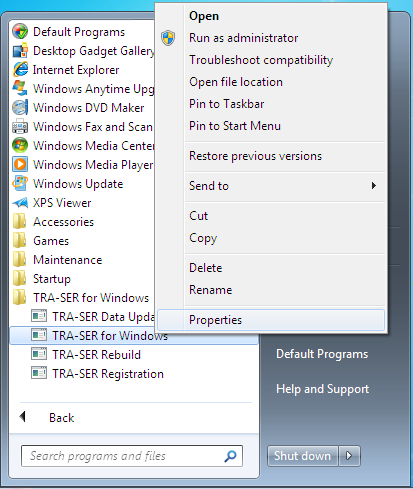
- Right click on the program's shortcut, .exe file, or installation program.
- Click on Properties. (See screenshot below)
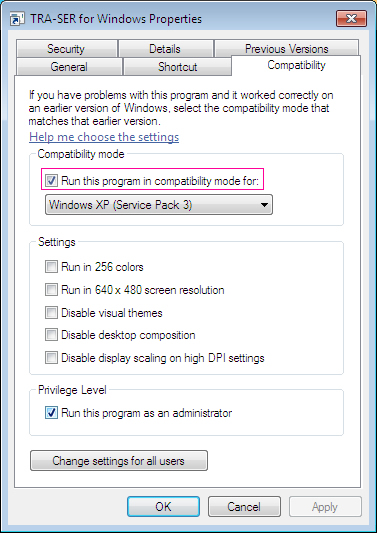
- Click on the Compatibility tab. (See screenshot below).
- To Run a Program in Compatibility Mode - Runs the program using settings from a previous version of Windows. Try this setting if you know the program is designed for (or worked in) a specific previous version of Windows.
- Check the "Run this program in compatibility mode for" box. (See screenshot below)
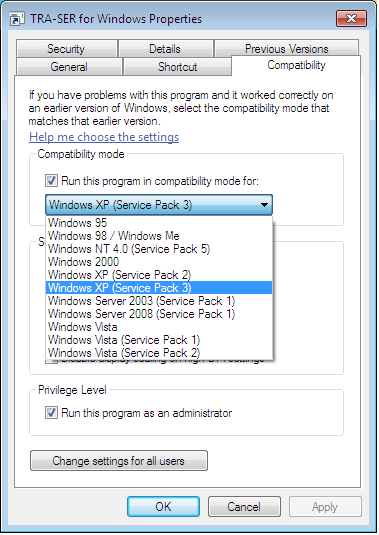
- Click on the drop down menu arrow and select which version of Windows the program was made for. (See screenshot below)
- Change the Privilege Level of a Program - This runs the program as an administrator. Some programs require administrator privileges to run properly. If you are not currently logged on as an administrator, this option is not available. Check the "Run this program as an administrator" box to enable this option. (See screenshot below)

- To Change All of These Settings Above for All Users -
- Click on the Change settings for all users button. (See screenshot below)
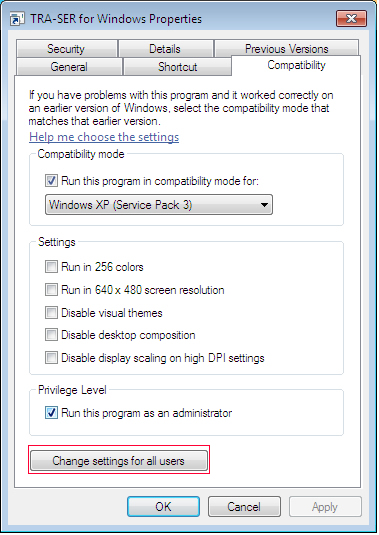
- Repeat steps 4 and 5 in this window to apply them to all users on the computer.
- Click on OK.
- Click on OK to apply the changes.
How can I run TRASER ® on Windows 7 64-bit?
Installing XP Mode - The First Step
Windows 7 has several built-in tools to help with program compatibility and Windows XP programs should be installed directly on Windows 7. Windows XP Mode runs many older Windows XP productivity programs and that are not natively compatible with Windows 7, thus helping realize cost savings and reduce possible operational downtime by extending the life of existing software. Windows 7's XP Mode allows you to run a separate version of XP inside the newer OS. The Virtual PC comes as a free but very large download (after all, it contains a complete copy of XP) that works in the Professional and Ultimate editions of Windows 7. You can download XP Mode from the URL below:
http://www.microsoft.com/windows/virtual-pc/download.aspx
Please pay particular attention to the edition requirements. Installation is straight-forward, just follow the prompts.
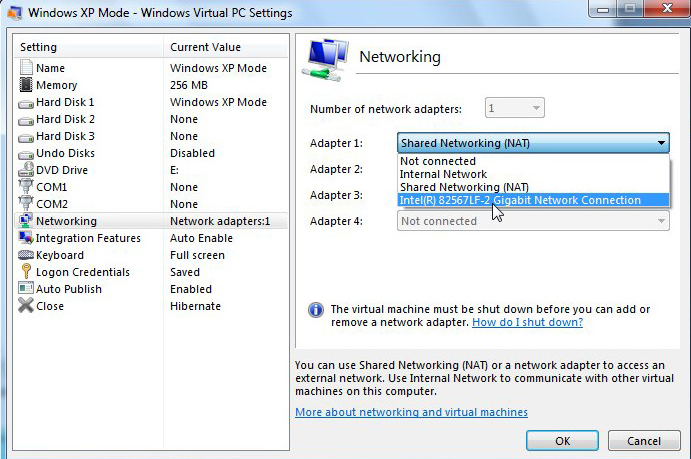
I have installed XP Mode. Now what?. Networking XP Mode - The Second Step
If you've got Windows 7 running nicely on your network, with access to the Internet, networked printers, and shared folders on other computers, XP Mode is going to initially disappoint you. You'll probably get the Internet just fine, but not your local network. You'll have to set up XP for the network separately. But first, you have to tell Windows 7 how XP should access the network. Please follow the steps below:
- If you're currently running XP Mode, exit it before going any further.
- In Windows 7, click Start, type virtual, select Windows Virtual PC, and press Enter. This opens a Windows Explorer window to the Virtual Machines folder. Right-click the Windows XP Mode file and select Settings (not 'Properties'--that's an easy mistake to make). In the left pane, select Networking. In the right pane, for Adapter 1, select your network adapter. Click OK . (See screenshot below)
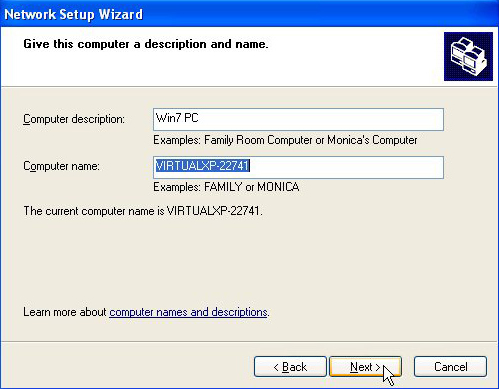
- When the dialog box is gone, load XP Mode. You can do this from that very same Explorer window by double-clicking the Windows XP Mode file.
- In your virtual XP environment, select Start, then Run, type netsetup and press Enter. Click Yes at the 'want to continue' dialog box.
- Go through the resulting wizard, answering the questions as if your system were a stand-alone XP PC (See screenshot below). Follow these bits of advice as you do so:
- Make sure that the Computer Name you enter is different from the one you use for the same computer's normal, Windows 7 environment.
- Be sure to use the same Workgroup name that other PCs on the network use.
- Turn on file and printer sharing.
Install TRASER ® - The Final Step
Now you can install TRASER ® on the XP Mode and it will operate properly.
XP Mode - Some useful resources
A lot of the information contained in this particular FAQ has been sourced from the following great XP Mode resources. We would highly recommend reading them for greater understanding of XP Mode - its potential and its limitations:
- Networking and Using Windows XP Mode
- Network in Window 7's XP Mode
|